How to Photograph the August 12, 2026 Total Solar Eclipse (Without Burning Your Eyes or Your Sensor)
So the eclipse is today. Like, literally tonight if you're in Europe, this afternoon if you're in Iceland, this morning if you're on the US East Coast. And I'm guessing a lot of you reading this panicked three days ago when you realized you hadn't ordered a solar filter yet, your longest lens is the 70-300 that came with your GH7, and you've never tried photographing the sun before. Yeah, that's basically where I was a few days ago.
Real talk first: I've only photographed one total solar eclipse before, the 2024 North American one, and I missed totality by like 8 minutes because I was messing with my intervalometer and dropped my remote in the grass. So I'm not pretending to be the authority here. But I did get the partial phases, I learned a ton of stuff the hard way, and the gear I tested that day is now my eclipse kit forever. Let me walk you through what I'd actually do today if I were heading out to shoot this thing, whether you're in the path of totality across Iceland, Greenland, or northern Spain, or just catching the partial eclipse from your backyard in New York or London.
Safety Is Not Optional. I Mean It.
I'm putting this first because if you skip past it because it sounds boring, you could literally go blind. And your camera sensor can also die. Both of those are real outcomes. NASA's eclipse safety page goes into this way more than I will, but here's the short version:
- During the partial phases (before and after totality), you must have a solar filter on the front of your lens. Not on the back. Not "I'll just shoot at f/22 it'll be fine." Front. Filter. On. The. Lens.
- Same goes for your eyes. ISO 12312-2 rated eclipse glasses. Regular sunglasses do not count. I cannot stress this enough.
- The one and only exception: during the brief period of totality, when the moon completely covers the bright face of the sun and you can see the corona, you can look and shoot without the filter. The instant any sliver of the sun's bright surface reappears (called the diamond ring), the filter goes back on immediately. Same for the camera.
If you haven't ordered a solar filter yet, you can still get one — companies like K&F Concept and Thousand Oaks Optical sell them on Amazon with same-day shipping in many US cities, and B&H has them in stock this morning. Don't cheap out. The knockoff filters from random eBay listings have been shown to leak IR light even when they look fine visually.
The Gear I'd Actually Pack
I'll break this into two lists: a "bare minimum" kit and a "if you want to go pro" kit. Either works.
Bare minimum (you can do this with most cameras you already own):
- Any camera with manual exposure control (mirrorless, DSLR, even some compacts)
- Your longest telephoto — 200mm minimum, 400mm+ preferred. I shot my 2024 eclipse with the OM 12-40mm on my GH7 for the wide environmental shots, and a borrowed 70-300 for close-ups. The GH7's micro four thirds sensor gives me an effective 600mm reach at the long end which is honestly the sweet spot.
- A solar filter that fits your lens filter thread size (or step-up rings)
- A sturdy tripod. Doesn't have to be a $600 carbon fiber job. I used a $40 aluminum travel tripod that day and it held the 70-300 fine.
- A remote shutter release (or use your camera's 2-second timer)
- Eclipse glasses for your face
Pro tier (what I'd pack if I were chasing this seriously):
- Two bodies so you can run a wide and a telephoto simultaneously
- A 600mm prime or a teleconverter on a 300mm f/2.8
- An intervalometer for the partial phases (set it to shoot every 30 seconds during the 2.5 hours of partial)
- A magnetic filter holder so you can pop the filter off and on in under a second
- A tablet or laptop running PhotoPills to track the eclipse path and timing
Pick Your Lens and Stop Down
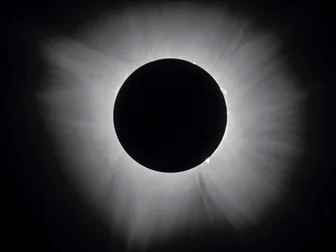
For the corona shots during totality, you'll want somewhere between 400mm and 800mm equivalent. Yes, that's a lot. Yes, you can shoot the eclipse at 200mm but the sun will be small in the frame and you'll need to crop heavily, which hurts image quality.
For wide environmental shots — the kind that show the eclipse happening over a landscape, with people watching and the eerie twilight setting in — anywhere from 14mm to 35mm works. These are arguably more memorable than the tight corona shots because they capture the feeling of the moment, not just the technical achievement.
For partial phases with a solar filter on, you can shoot at any focal length. The sun is small no matter what until you hit 400mm+, so don't sweat this too much. I usually shoot at 200mm for partial phase sequences and they look great as a stack later.
Aperture-wise, during totality you'll want to be around f/5.6 to f/8. Stopping down further (f/11, f/16) will give you sharper sunspots and cleaner corona details, but you'll need longer exposures and that's where tracking starts mattering. For the partial phases with the filter on, anywhere from f/8 to f/11 works.
The Settings That Actually Work (Tested)
These are the settings I used during the 2024 eclipse with my GH7 and a 70-300mm at 300mm. They're a starting point, not gospel — your local conditions will vary, and you should absolutely practice with the moon beforehand because the moon and the uneclipsed sun are very different brightness levels.
Partial phase (solar filter ON):
- ISO 100
- f/8 to f/11
- Shutter speed: 1/4000 to 1/1000 (this varies a LOT based on filter density and sun angle)
- Bracket exposures! I bracket ±2 stops on every shot because the brightness changes as the eclipse progresses and as clouds drift through.
Totality (solar filter OFF — corona shots):
- ISO 100-400
- f/5.6 to f/8
- Shutter speed: 1/4000 to 1 second, bracketed across that whole range
- The corona has an enormous dynamic range. You cannot capture it in a single exposure. Stack brackets later in Photoshop or use the Sequator freeware for HDR merging.
Diamond ring and Baily's beads (right at the start and end of totality):
- These last maybe 2-5 seconds. Practice finding them on your screen beforehand.
- Settings: ISO 200, f/8, 1/1000 to 1/4000. Bracket.
The Filter Switch Is the Whole Game
If there's one piece of advice that matters more than all the others combined, it's this: practice putting on and taking off your solar filter before eclipse day. Like, today. Right now, if you can.
During the 2.5 hours of partial phases, the filter stays on. Then totality begins — you have somewhere between 90 seconds and 4 minutes (depending on where you are in the path) to capture the corona without the filter. Then the filter goes back on for the rest of the partial phases.
If you fumble the filter swap, you miss totality. That's it. No do-over for 18 months minimum.
Magnetic filter holders are the answer here. The K&F Concept magnetic system I bought last year attaches in literally half a second. Screw-on filters take 10-15 seconds, and that's enough time to lose 5% of totality. Buy the magnetic system if you can.
Practice on the Moon Tonight
Tonight. Find the moon. Shoot it at the same focal length you plan to use for the eclipse. Try the focus. Try the exposure. Get your framing dialed in. The moon is way brighter than the corona, so don't try to match exposures, but the focusing and composition practice is priceless.
Focus: use manual focus with focus magnification (most mirrorless cameras have this — punch in 5x or 10x on the live view and rack focus until the lunar craters are tack sharp). Once you nail it, switch to manual focus mode and tape the focus ring so you can't accidentally bump it. Auto focus will hunt and miss during the eclipse and you don't have time to deal with that.
What About Composition?
This is where the difference between "I got an OK eclipse photo" and "I got a once-in-a-lifetime eclipse photo" happens. The tight corona shots are cool, but they're kind of interchangeable — everyone's corona looks like everyone else's corona at the same scale. The wide environmental shots with a meaningful foreground subject are the keepers.
Some ideas I considered for this one:
- A church spire or iconic landmark in the path of totality, with the eclipsed sun directly above it (use PhotoPills to plan the alignment)
- People silhouetted watching, with the corona visible above their heads
- Reflections in water (lakes, harbors, anywhere with a still surface)
- Wildlife in the foreground — animals act weird during totality, birds go quiet, which is dramatic
If you're in Reykjavik, the Hallgrímskirkja church spire will align with the eclipse in the early evening. If you're in northern Spain (Bilbao, A Coruña), the coastline makes a great foreground. If you're on the Balearic Islands, the eclipse sinks into the Mediterranean — which is rare and visually stunning.
Common Mistakes I've Made or Seen
Real talk, list of things I screwed up:
- Setting up the tripod too late. I did this in 2024. Got to my spot 20 minutes before partial began, hadn't pre-planned the framing, was scrambling with the tripod. Have everything set up at least an hour early.
- Forgetting to tape down the focus ring. A gust of wind rotated my 70-300's focus ring 10 minutes into partials and I didn't notice until I got home. Soft as hell.
- Not bringing a chair. Standing for 2.5 hours with a long lens pointed up is brutal on your back and neck. Bring a small folding chair or stool.
- Battery died mid-totality. I thought I had 40% left. The cold weather (it was like 5°C in northern Vermont in April) killed the battery in 90 minutes. Bring spares, keep them in an inner pocket against your body.
- Cleaning the sensor right before. Don't. Static from the blower can attract dust onto the front element right before totality. Clean the night before.
- Shooting in JPEG. I know storage is cheap, but for an event that won't happen again for years, RAW gives you so much more room to recover the corona detail later. RAW, always.
If You Can't Get to the Path of Totality
Most of you reading this are not in the path. That's fine. The partial eclipse is still a cool thing to photograph and worth the effort of a solar filter. You just need to manage your expectations — a 60% partial looks like a small bite taken out of the sun, not the dramatic totality image everyone's sharing from Iceland.
For partials, the wide environmental shots work best. Show the sun in the context of your local landscape. The lighting during a partial eclipse gets weird — colors shift, shadows sharpen, everything looks slightly off in a way cameras can capture but human eyes struggle to describe. That's worth photographing.
One More Thing: Just Watch It
I know this is a photography site and I'm supposed to tell you to shoot everything. But seriously: take 30 seconds during totality to just look at it with your eclipse glasses off. Don't look at your screen. Don't adjust exposure. Just look. Totality is one of the most emotionally overwhelming things you can witness and you'll regret it if you spent the whole 2-4 minutes hunched over your camera trying to nail the perfect corona shot. Bracket your exposure, set an intervalometer, and then look up.
The photos will be there. The moment won't.
What I'd Pack Today If I Were Starting From Scratch
I keep saying this list and I keep meaning to type it out, so let me just commit:
- Camera body: any modern mirrorless with manual exposure
- Lens: 70-300mm (your kit lens if nothing else)
- Tripod: anything that holds the lens steady
- Solar filter: K&F Concept magnetic system, sized to your filter thread (typically 67mm or 72mm)
- Remote shutter: $8 Amazon basics wired remote
- Eclipse glasses: 5-pack from a reputable seller, ISO 12312-2 rated
- Spare batteries: 2 minimum, in inner pocket
- Spare SD cards: yes plural
- Folding chair: yes really
- Hand warmers: yes, even in summer, the eclipse lasts hours
- Notebook: write down your settings for each phase. You'll thank yourself later when you're stacking brackets in Photoshop at 2am.
That's it. Total cost if you're starting from zero camera-wise: $1500-2000 for a used mirrorless + lens + tripod + filter. Which is a lot, I know, but you can do 90% of this with whatever you already have plus a $30 solar filter.
Alright, that's my eclipse plan. Total Solar Eclipse 2026 happens today, August 12, with the path of totality crossing Iceland, Greenland, northern Spain, and parts of Portugal. If you're in those places, get outside. If you're not, find the partial timing for your city and shoot that. And remember to look up.
Now I have to go figure out where I can watch the partial eclipse from Hong Kong because that's where I'm writing this from, and the partial is only like 5% here but still.