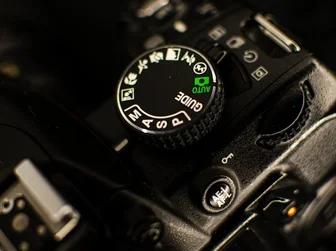
Most camera mode dials follow a similar layout with Auto, P, A/Av, S/Tv, and M modes.
New to photography? Confused by all those letters on your camera dial? You are not alone. Understanding camera modes is your first step to taking control of your images instead of letting your camera make all the decisions.
Auto Mode: The Training Wheels
Every camera has an Auto mode (often marked green). Point, shoot, and the camera decides everything—aperture, shutter speed, ISO. It is foolproof but limits your creativity. Use Auto when you are just starting or in fast-moving situations where you have zero time to think about settings. But do not rely on it forever. You will never learn if your camera does everything for you.
Program Mode (P): A Step Up
Program mode gives you some control while the camera handles the basics. You can adjust white balance, exposure compensation, and ISO while the camera sets aperture and shutter speed. It is a nice middle ground—better than Auto but less intimidating than full Manual. Great for beginners who want a little more flexibility without the pressure of controlling everything.
Aperture Priority (A/Av): The Sweet Spot
This is the mode most photographers use 90% of the time. You set the aperture (f-stop), and the camera automatically picks the right shutter speed. Why? Because aperture controls two critical things: depth of field and light intake.
Wide aperture (f/1.8-f/2.8) creates that dreamy blurry background perfect for portraits. Narrow aperture (f/8-f/11) keeps everything sharp for landscapes. You just pick the look you want, and the camera handles the rest. If you only learn one mode, make it this one. Check out our complete Photography Basics guide for deeper explanations of aperture and other settings.
Shutter Priority (S/Tv): Motion Control
Shutter Priority is the opposite—you set the shutter speed, and the camera picks the aperture. This mode shines when you are shooting sports, wildlife, or anything moving fast. Want to freeze a bird in flight? Use 1/1000s or faster. Want to blur waterfalls into silk? Try 1/15s or slower. You decide the motion effect, and the camera ensures proper exposure.
Manual Mode (M): Full Control
Once you understand how aperture, shutter speed, and ISO work together, Manual mode becomes your playground. You set all three manually. It takes practice, but gives you complete creative control—especially in tricky lighting situations where other modes might confuse your camera.
Pro tip: Most cameras display a light meter when in Manual mode. Learn to read it—your exposure should hover around the center mark. Our 10 Photography Tips article covers more about using your camera light meter effectively.
Quick Recommendation
Start with Aperture Priority. Master it until adjusting f-stops becomes second nature. Then experiment with Shutter Priority for action shots. Only move to Manual when you feel constricted by the automatic modes. Remember: the best mode is whichever one helps you capture your vision without fighting your camera.
Ready to practice? Pick up your camera and spend a week shooting only in Aperture Priority. Notice how changing f-stops affects your photos. That is how growth happens—one mode at a time.
Want more beginner guidance? Explore our Beginner Guides archive, or learn Photography Composition Basics for step-by-step tutorials.